Show Formulas in OpenOffice Calc

By default, OpenOffice Calc shows only the results of formulas in a worksheet. To see a formula itself, you have to click on the cell and view the formula in the input line. This can be frustrating when you want to look at all of the formulas in a worksheet. Learn how to show formulas in OpenOffice Calc.

Understandably, formulas are hidden in an OpenOffice Calc spreadsheet so the results of the formulas can be seen. This makes it difficult to see at a glance whether a cell contains a formula or just some text/numbers. The only way to quickly see a formula in Calc is to click on the cell and view its contents in the input line.

Fortunately, Calc has a built in option that displays the formulas rather than the results of the formulas in the cells. Using this feature, you can simultaneously view all of the formulas in a spreadsheet without having to click on the individual cells. When finished, you can deselect the option and view the results again.

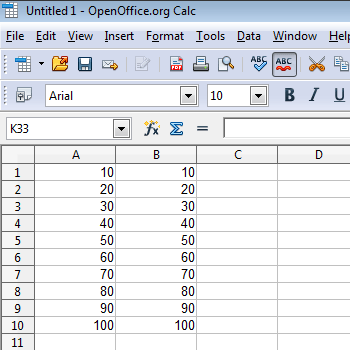
Suppose you have spreadsheet that looks like the one below. Note that the contents of columns A and B look identical. However one of the columns contains the numbers and the other contains a formula reference to those numbers. At quick glance, you can’t tell which is which.

Two Similar Columns in OpenOffice Calc

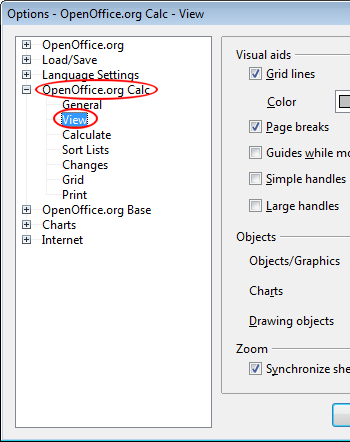
To show the formulas in the cells, click on Tools>Options to open the Options window. In the left hand pane, click on OpenOffice.org Calc and then on View.

OpenOffice Calc View Options Window

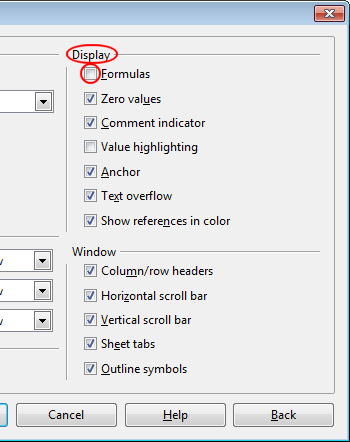
When you click on View, the right hand side of the window changes to show you what options are available. Locate a section of the window labeled Display. Check the option labeled Formulas and then click the OK button.

Show Forumulas in OpenOffice Calc

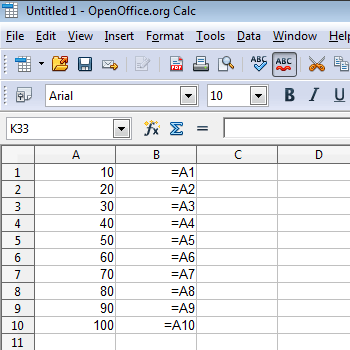
Back on the spreadsheet, notice that Calc replaces the results of the formulas with the formulas themselves. Now you can see all of the formulas at once without having to rely on clicking on each cell and looking at the input line.

Viewing All Formulas in an OpenOffice Calc Spreadsheet

There is also a shortcut method to showing all of the formulas if you don’t want to use the options method. Hold down the Ctrl key on your keyboard and press the ~ (tilde) key. This allows you to toggle back and forth between the show formulas and hide formulas views.

Although foreign to some users, some people prefer to work in show formula mode while working in large spreadsheets. This way, they are not distracted by whether each individual formula is typed in correctly and can concentrate on getting the main parts of the spreadsheet completed before worrying about the details.

Using a menu option or the Ctrl+~ shortcut, you can force OpenOffice Calc to show all formulas in a spreadsheet. This makes it far easier to troubleshoot formulas that were type in incorrectly. In addition, you can see which data in a worksheet are simply numbers/text and which are calculated from formulas.

View the original article here

Facebook: How Do I Hide My Status Updates from Certain People?

1. Log in to your Facebook account.

2. Click on Status-> Click on the lock-> Customize.

3. In Custom Privacy window, you can decide who can see your status updates from Make this visible to these people drop down menu. To prevent specified people from seeing your updates, just provide them in Hide this from these people. You also have an option to make that your default setting by checking the checkbox near the corner.

4. Hit Save Setting.

View the original article here

Disable Annoying Internet Explorer 8 Alerts and Pop-ups

Internet Explorer 8 (IE8) is an important player in the web browsing market. Packed with features and options, sometimes this browser gets a bit annoying in comparison to other browsers. Some of this annoyance comes from the several alerts and pop-ups that interrupt your Internet browsing.

Luckily, most of IE8′s annoying alerts can be disabled. However, disable these alerts at your own risk. These alerts are, after all, there for a reason. Disable one and you just may miss an important message from the application.

In a strange twist of irony, Microsoft has chosen to use a pop-up in the form of the Information Bar to alert you to a pop-up that has been thwarted by IE8. These alerts can be annoying especially since you were likely trying to stop your web browsing experience from being interrupted in the first place.

To disable IE8′s pop-up blocker alert, begin by opening up Internet Explorer 8 and clicking on Tools>Internet Options. This will open up the Internet Options window. Click on the Privacy tab and locate the section of the window labeled Pop-up Blocker.

Click on the Settings tab in this section and notice that you are now looking at the Pop-up Blocker Settings window. Locate the section titled Notifications and Blocking Level and uncheck the two options labeled Play a Sound When a Pop-up is Blocked and Show Information Bar When a Pop-up is Blocked.

Disable IE8 Pop-up Blocker Alerts

Click the Close button and then the OK button on the Internet Options window. That’s it; now IE8 won’t alert you that pop-ups have been blocked.

IE8 is not alone among web browsers that constantly check to see if they are the default web browser for your computer. Therefore, this one can’t solely be blamed on Microsoft. Still, that window that pops up to check to see if IE8 is the default browser is annoying, especially if IE8 really isn’t your default browser and you have no intention of defecting.

To disable the default web browser alert in IE8, once again click on Tools>Internet Options. However, this time click on the Programs tab and locate the section of the Internet Options window labeled Default Web Browser. Look for and uncheck the option titles Tell Me if Internet Explorer is Not Currently the Default Web Browser.

Disable IE8 Default Web Browser Check Alerts

Click the OK button and you are done; no more alerts about whether IE8 is your default web browser.

This one doesn’t affect everyone; it depends on whether you have certain programs or diagnostic tools installed on your computer. Still, this alert is annoying since many web sites out there have some minor programming glitches that trigger the debugging alert.

To disable the IE8 script debugging alert, once again click on Tools>Internet Options. This time, click on the Advanced tab in the Internet Options window. Locate a section of the window labeled Settings and then a section under Settings labeled Browsing. Uncheck the two options titled Disable Script Debugging (Internet Explorer) and Disable Script Debugging (Other).

Disable IE8 Script Debugging Alerts

Click the OK button on the Internet Options window and you are done; no more alerts about script debugging for web sites with script errors.

IE8 was a step forward in the Internet Explorer line of browsers. Improving upon the long-awaited IE7, IE8 increases browsing security and put it back into the competition among other popular browsers. Disabling IE8′s three most annoying alerts is a simple matter. Just be sure you are OK with not receiving these alerts on a regular basis. You just may miss an important one.

View the original article here

OS X: How to Check For and Install Software Updates from the Command Line

1. Open Terminal.

2. Execute the following command to see what software updates are available:
softwareupdate -l

It will take a minute or two to come back with a list of updates

To install only the recommended updates, execute the following:
sudo softwareupdate -irv

or

To install all available updates, execute the following:
sudo softwareupdate -iav

To install a specific update, execute the following (where iTunesX-10.1.1 is the update name):
sudo softwareupdate -i iTunesX-10.1.1

To ignore a specific update, execute this instead (where iTunesX-10.1.1 is the update name):
sudo softwareupdate –ignore iTunesX-10.1.1

To clear the list of ignored updates, use:
sudo softwareupdate –reset-ignored

To download an update to install later, use (where iTunesX-10.1.1 is the update name):
sudo softwareupdate -d iTunesX-10.1.1

View the original article here

Facebook: How Do I Hide or Delete a Conversation from Messages?

To archive a conversation:

1. Log in to your Facebook account.

2. Go to Messages, find the conversation you want to archive and click the X button.

This X can be found on the far right on the list of messages.

3. You can later find the conversation by clicking on the small arrow next to the magnifying glass and choose Archived Messages.

To delete a conversation:

1. Go to Messages, click on the conversation you want to delete.

2. Choose Actions->Delete…

Note: Deleted conversations can not be recovered.

View the original article here